The following suggestions are gathered from repeat visits to the slot canyons. I hope to share some of my experiences I have gathered to help make your next visit more fun and productive.
The slot canyons referred to as Upper or Lower Antelope Canyon are located in the Page, Arizona area. They are also referred to as Corkscrew Canyon. They are a unique experience you will have trouble finding anywhere else. It is challenging to photograph here but if you are properly prepared, you are almost guaranteed to come back with an image or two that you will be very happy with. It is a must, to experience this location of sculpture canyon walls of sandstone at least once in your lifetime, even if you are not a photographer. Upon repeat visits, you will find additional photographic opportunities every time.
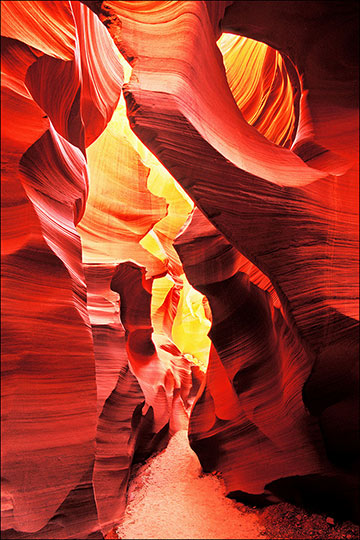
Upper Antelope Canyon:
Both Antelope canyons are nice and have their own special charm. Upper Antelope Canyon is smaller, but more of a condensed beauty. It is also easier to navigate and suitable for all ages.
While the photographic possibilities of the entire Antelope Canyon are interesting, one of the unique areas of interest is the light beans that pierce from cracks on the ceiling shining down into the depths of the deep canyon walls. The best light beams and most of the antelope slot canyon photographs you may have seen probably are from the Upper Antelope Canyon.
You can make arrangements to visit by signing up in the town of Page to go with a guide to visit Upper Antelope Canyon. The regular tour will give you about 50 minutes of actual time in the canyon. Another option is a longer tour geared more to photographers for a slightly higher price. The tour will drive you from Page, AZ the short five miles down highway 98 to the location and drive you back to your car in Page when done.
The best or most popular time to photograph Upper Antelope Canyon is in the summer from around 11 am to 2 pm. I was told by the guide office that the best months for the beams are June, July, and August. The higher sun will not only bring additional light into the canyon but also contribute to the formation of beams of light filtering from selective ceiling cracks. When selecting a tour time for photography, you should consider this.
Be sure to find out from the guide the locations and times when the shafts of light come from the ceiling area and stake out the area with your tripod early before the best shooting locations get crowded. Due to limited space at the light beam areas, you have to take on a spirit of cooperation and sharing with the other photographers. This is one of those times when giving other photographer's the shaft is actually a good thing.
Another option may be to visit in the fall or spring months which will be less crowded, cooler, and may have lower tour costs. While I have not photographed during the winter, the sun will not be as high of an angle and this should affect the amount of light reaching the bottom of the canyon. I have to believe you can still get great photographs any time of the year if photographing the beams is not your highest priority. I personally always strive to get something unique and different from the other photographers. This can be a challenge at this popular photographer's hot spot and photographing off-season could be a better opportunity.
The beam of light comes from small cracks at the top as the sun passes overhead during certain times of the day. The beam does not last very long and will actually move across the width of the floor before your eyes until the beam disappears. Since this may only last a few minutes, you will want to be set up in advance with a tripod and take some test exposures, if you are digital, to get the best exposure in advance.
The secret of getting the beam to light up is to throw sand, which is available on the dry stream floor, straight up in the air under the light beam. The heavy sand quickly falls to the ground but the lighter sand or dust floats giving the light beam something to reflect off of enhancing the beam's brightness.
Most of the time you will use a wide-angle lens in the slot canyons, but you may want to put on a medium telephoto lens to get some details on the rock walls or ceilings. Do not forget to look up and all directions since great images can be found in the details.
You may notice that when your images come back from processing that the walls have a red color to them. I always found this interesting since I could not see that degree of red at the time of my visit due to the lower light levels. Some of this may be due to the use of Fuji Velvia slide film. This film can bring out the reds and is a favorite film of many landscape photographers especially photographing the slot canyons.
The Upper Antelope Canyon area is smaller than Lower Antelope Canyon but easier to access and very beautiful. Upper Antelope Canyon is visited much more than the Lower Antelope Canyon and can get very crowded. Many non-photography tourists visit Upper Antelope Canyon for a short time and leave. As a photographer, I would give your self at least two hours.
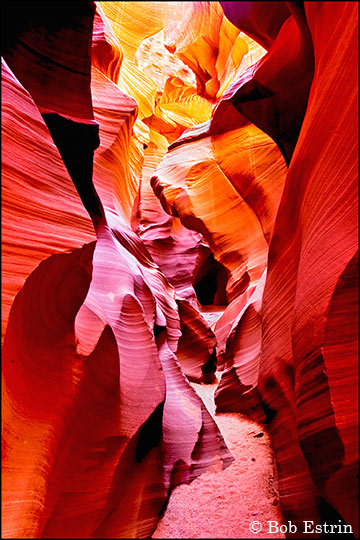
Lower Antelope Canyon:
Lower Antelope Canon is run by a different family and is located just slightly down the road and across the street from the Upper Antelope Canyon. The Lower Antelope Canyon is much larger, longer, and much less crowded. I think your average tourist likes the ease of the Upper Antelope Canyon. There is no organized tour from Page for Lower Antelope Canyon. You can ask anyone in Page, AZ how to get to Lower Antelope Canyon and drive the short distance from Page. The parking lot is just off Highway 98. You pay an entrance fee at the booth and tour the slot canyon at your own pace. The guides wander around in the slot canyon but are not assigned to any particular group.
You need to make your way down a small opening to initially get into the canyon. Don't let this intimidate you since it gets easier. Ask the guide to help you down or carry some of your equipment to the bottom area. The guides can be very helpful and I found they generally want to make your visit pleasant in this family-run business. There are ladders now in difficult areas to make it much easier to navigate. I am sure it was much more involved in the pre-ladder days.
For the Lower Antelope Canyon, I recommend early in the morning but I have had good results at different times also. Depending on the time of the year, there are a few places that a shaft of light appears in the Lower Antelope Canyon area which you should inquire about when you arrive if interested. There will be guides inside the canyon that can answer your questions and give advice on the best locations to photograph. The guides in the Lower Antelope Canyon will even toss sand to help you light up the beams if you ask.
Some of the areas of the Lower Antelope Canyon can be a tight squeeze with a larger camera bag and a tripod. If you have a photo backpack, that would be a better option. Since Lower Antelope Canyon is not as discovered yet, it has fewer visitors making for a less crowded feel. In certain tight areas you just need to move your set up a tripod and let people by.
There is a long spiral stairway at the end of the Lower Antelope Canyon that goes to the surface. One option which is faster and easier is to go up the stairs and walk down the dirt path to the parking lot. You can also choose to go back the way you came in which is what most people do because they do not know about the other way.
Lower Antelope Canyon has some covered picnic tables next to the parking lot providing some shade. If you bring a bag lunch, this is a good place to relax and eat after your adventure.
Exposure information:
Exposures can be tricky in a slot canyon but some general exposure advice can be given as a starting point. If you are using a digital camera, your LCD preview of the image and analyzing your histogram should get you close to a good exposure. If you are not that experienced at photographing under dark and difficult lighting conditions, I would use a tripod, set your camera at ASA 400 or 800 and use the program mode or aperture priority mode at F8. This should give you decent results. If you do not change your ASA often, please remember to change it back to the ASA you use for regular outdoor settings again when you leave the slot canyon. I have additional exposure information below for those who want to know more.
The Upper Antelope Canyon is darker than Lower Antelope Canyon, so if you photograph both, you should expect longer exposures for Upper Antelope Canyon. My exposure guidelines are based on using a tripod and not hand-holding. Also using a flash for exposure in Upper Antelope Canyon could ruin other photographer’s shots that are using long exposures since the flash may bounce off the canyon walls down the canyon even in areas that you can not see. With a good exposure, you should not need flash in most cases.
While I mention longer exposure such as 20 seconds in my descriptions, please understand that I use long exposures all the time during low light or nighttime photography and I am more comfortable in using them. If you are not, you can adjust your camera settings to use shorter exposures that you are more familiar with. I suggest you try a few longer exposures just for the experience and review the results later in comparison to your other shorter exposures.
One thing that helps me determine my ASA or ISO is what the intended use of the photos will be. In my case, I photograph at lower ASA such as 100 when possible since I sell larger fine art prints such as 20x30 or 26x36 inch prints. Most people do not have this need and using a higher ASA of 200, 400, 800, or even higher when needed is just fine and for most needs will not affect the overall quality when using the newer DSLR cameras. Photographing at a higher ASA such as 400 offers you the advantage of getting more depth of field or using a higher shutter speed.
One exposure method for photographing in a darkened area such as a slot canyon would be to start at ASA 400 and F8 and see where your shutter times fall for the particular lighting situation. You can always change to ASA 800 or 1200 if needed. For digital cameras, I try to keep my exposure times to 30 seconds or less since longer exposures add noise to the image. While I try to photograph using F8 or higher such as F11, it is not always required to get the depth of field you want when using a wide-angle lens and you could photograph at F5.6 if you need to. It is really a need to adjust your ASA, F-stop, and length of exposure to work best for the specific shooting condition you are in to get the results you want. When using a tripod, I usually do not mind a long exposure such as in the seconds since nothing moves in most of the antelope canyon photographs.
Photographing the beams:
The first thing I would do is arrive early at the beam location before the beam shows up and take some test exposures. Select the best exposure as your starting exposure for your photographs when the beam shows up. When photographing the beams, the bright beam will actually will move along the floor during a very long exposure, so this should be taken into consideration when determining your exposure length (shutter speed). I would try to keep your beam exposures 20 seconds or less. The reason is that you are not only photographing the light beam but additionally you are photographing the dust particles suspending or floating in the beam after you throw sand into the beam light. Most of those particles will have fallen down after about 20 - 30 seconds. I would try different exposure times and after reviewing the results with your digital camera, make future exposures adjustments based on your results from the previous beam exposures.
Also your beam exposure may differ based on how much sand you throw up into the area that hits the beam area. Since the beam will probably come down at an angle, I suggest you have two people coordinate the sand throwing with one hitting the upper half of the beam and the second the lower half of the beam for best coverage. You want to make sure the sand that immediately falls does not hit you, the other photographers, or any camera equipment. Since the beam does not last that long, I would be ready to make as many exposures as possible to maximize your chances of getting a good image. This will involve coordinating with the other photographers, going through the process of throwing sand, running back to your camera to get out of the way of other people's shots, and taking your own photographs. This process can be repeated for as long as the beam is still in a good position for it to be photographed.
When I see many Antelope Canyon beam photographs, the beam area that hits the sand is usually 2-3 stops overexposed which causes the detail in the sand to not show up at the area where the beam hits the sand. One option you have is to try is taking a second exposure right after each beam shot with a faster shutter speed while keeping your F-stop the same making an exposure just for the beam area in the sand. This will give you detail in the sand and you have the option to later merge the two images together.
General Antelope Canyon photo advice:
Be prepared for very long exposures and bring a tripod and cable release to photograph here. The light levels in the Upper Antelope Canyon are low and exposures can be long. The light levels in the Lower Antelope Canyon are much brighter but still requires a tripod and long exposures. Even though I love my polarizing filter, it just is not practical to use one in such low light conditions. If your camera has a mirror lockup option, you may want to use it.
You may also want to bring a small flashlight and a bottle of water during the summer.
Bring way more film than you think you will need, at least twice as much. If this is your first visit, I think you will be surprised by the photographic opportunities on every angle and turn. Be sure not just to point your camera straight ahead but look up, at different angles, and even behind you as walk down the canyon.
Due to the extreme sandy and dusty conditions in the air, it is not a good idea to change the lens in the slot canyons that often. This is especially true for digital cameras. A nasty bit of sand or dust on your digital sensor could affect all future photos on your trip. You could change the lens in a protective plastic bag or walk outside for a short time. When changing lenses on a digital camera it is best to point the camera facing down and with the camera, power turned off. I would bring a brush or lens cloth and occasionally dust off the front of the lens.
The Antelope Canyon area is mainly a wide-angle lens area but some close-ups with longer lenses have their place in certain areas to capture areas of detail.
Try not to just light up the top part of the beam with the sand but all areas to the bottom. The beam looks better if lit even from ceiling to floor. You can get another photographer to throw the sand with you in a coordinated effort for full beam coverage and then run back to the camera to immediately press the cable release.
It is difficult to see if you lit up the beam well even if you have a digital review. I recommend taking the photograph multiple times since it is difficult to determine if the beam is fully lit or lit to your satisfaction. Just go back and throw some more sand into the air. It's a fun experience.
The beam may move across the floor in a matter of minutes or even less from one side to the other while you are taking photographs. The composition may quickly change. You still may have time to set up for a different view and shoot from a second location. Since time is limited when the beam is showing, I would pre-determine your second location and general composition in advance. The beam locations can be crowded and you do not want to get in the way of others when photographing.
Another hint is to not use flash when others are photographing. One flash during a 10-30 second exposure from another photographer may ruin their shot. I have tried using flash in areas without people and it did not seem to help since the longer exposures using the magical natural light is the effect I find most appealing.
When in a slot-type canyon that is not guided, be aware that a rainstorm from far away can quickly bring flash flood water down a canyon even if the sky is blue above you. These two slot canyons are guided and their experience should provide you warning protection against the dangers of a flash flood.
I recommend that you bracket your exposures on selected photographs. When shooting slides, I would also make an exposure ½ stopover and ½ stop under when appropriate. You may find that the slides look better at different exposures which may not necessarily be the most accurate exposure. This is not as evident when shooting print film, since the print processor tends to adjust the printed output. Different exposures on negative film less than ¾ of a stop difference may look very similar on the final print. I found ½ stop bracket on slides and 1 stop bracket on negatives worked out well for me.
Another recommendation that I learned from experience is to try to as a general rule never get in your frame a section of the rock upon the top area that is directly lit by the sun. It looks like it will come out but in reality, it will be a blown-out highlight due to the long exposure and can ruin your image. One option is to photograph two different exposures of the same scene and combine them later. If using slide film, you could expose for the highlighted area and let the shadow areas go dark. You can then try to bring out the shadow or darker areas in post-production.
Both Upper Antelope Canyon and Lower Antelope Canyon were different experiences for me. You may want to go to Upper Antelope Canyon on one visit and Lower Antelope Canyon on the next. If you want to visit both on the same day, part of the entrance fee is for a general daily permit to go on the Navajo tribal land. If you show them your receipt at the other canyon, you do not need to pay that part of the fee again. I would make an appointment in advance with the tour to Upper Antelope Canyon in the general 10 am to 2 pm prime time slot and go early in the morning to the Lower Antelope Canyon for one or two hours.
The slot canyons are more than just a tourist destination to the Navajo people. They have special religious and cultural importance. Special consideration should be taken to show proper respect.
I hope some of these suggestions help make your next visit to Antelope Canyon a great one.
Feel free to enter in comments (without internal links). The last 10 comments will be on display with the option to view previous comments if you want.
Copyright 2007 Bob Estrin
Feel free to link to this article from your non commercial web site.
Bob Estrin Photography is a participant in the Amazon Services LLC Associates Program, an affiliate advertising program designed to provide a means for sites to earn advertising fees by advertising and linking to amazon.com.